 As computers and notebooks evolve into multimedia playback centers, reliable, quality sound becomes ever more important. Alas, many problems with your computer’s audio can arise at any moment. Audio troubles can originate from hardware and software sources, and you can even track these issues back into your computer’s most basic operating code, the BIOS (Basic Input/Output System). If your computer’s audio doesn’t sound quite right or isn’t making any sounds at all, try walking through these audio troubleshooting basics.
When Silence Is Not Golden
The most common audio frustration seems to be not being able to get any audio at all. Unfortunately, there are many sources of this problem, from the embarrassingly obvious to the most technically daunting. First, check your hardware: Make sure that you’ve correctly connected the speakers to the audio outputs of the computer and that you properly power up the entire set. Most external PC speakers require their own power source that you need to plug in and turn on. After power outages, for instance, when you turn your computer back on, your speakers may not power back up unless you do so manually. Also, make sure that you turn the speaker volume back up to audible levels. These may seem like painfully obvious solutions, but in our experiences we can trace back many “no sound” problems to the simplest oversights. Next, check to make sure that Windows recognizes your audio hardware. Click the Start menu, select Settings, and click Control Panel. In the Control Panel window, double-click the System icon. In the System Properties window, click the Hardware tab and then under Device Manager, click the Device Manager button. This window shows an outline of your hardware and the software drivers that make them work properly with Windows. Double-click Sound, Video And Game Controllers to check to make sure none of your audio devices has a red X on it. If you see a red X, this means that your computer recognizes the audio hardware, but the drivers are not properly installed. In this case, you’ll need to reinstall your audio controller drivers. To do this, please see “Basic Troubleshooting: Audio Cards”.
If all of the hardware is operating correctly and you still can’t hear anything, then you need to check the volume settings in Windows XP. First, open up Windows Media Player (or a music player of your choice) and start playing a song so you have a constant audio stream for testing. Click the Start menu, select Settings, and then click Control Panel. In the Control Panel window, double-click Sounds And Audio Devices. In the Sounds And Audio Devices Properties window under Device Volume, look to see if there’s a check mark in the Mute box; if there is, click the box to uncheck it. In this same area, move the Device Volume setting to High. If this doesn’t work, then click the Advanced button in this area. In the Play Control window, you’ll see different sliders that control the various channels of your audio. The Play Control slider (far left) is for overall output level, but other sliders regulate the output for specific audio types. Most of your Windows sound effects and media playback come through the Wave channel, and some CDs play through the CD Player channel. Make sure there are not check marks in these channels’ Mute boxes and set the sliders to about 70% (a line or two away from the top). If this doesn’t work, you will have to make sure that the PC knows you have speakers connected. In the Sounds And Audio Devices Properties window, click the Advanced button in the Speaker Settings box. In the Speaker tab, if the Speaker Setup field says No Speakers, then your PC may not be driving any sound to the output channels. Click the dropdown arrow to select the setup that matches your speaker configuration and then click OK.
Can You Hear Me Now?
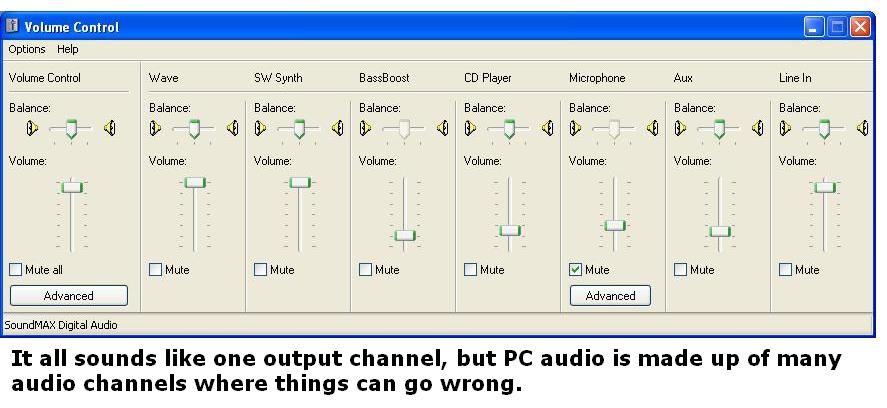 Getting a microphone to work properly on a PC can be a daunting task in itself. For starters, the microphone signal may be coming into your PC across one of several channels. To ensure that all of them are open, go back into the Sound And Audio Devices Properties menu via the Control Panel (see directions above). Click the Volume tab and the Advanced button in the Device Volume area. In the Play Control window, click the Options menu and make sure Advanced Controls has a check mark next to it so that you can see all of the available channels. With the same Options menu open, click Properties. In the Properties window under Adjust Volume For, select Recording. Under Show The Following Volume Controls, put check marks in all of the available boxes and click OK. You should now see all of the possible recording channels from your hardware. It’s most likely that the microphone or headset is using the Microphone or Line-In channel, so make sure the volume levels on each of these is at 70%. Again, in the Play Control Window click Options, Properties, and this time select Playback and place check marks in all of the boxes under Show The Following Volume Controls. Click OK to see the full range of playback channels available to you. Be sure to set the volume levels for all channels at about 70%. In some configurations you may have trouble recording from a microphone or using a headset for voice chatting if the Line-In or Microphone channels are set to Mute. If they are, simply uncheck the Mute boxes in each of these channels and test the audio recording again. The most effective way to set your audio input is through the well hidden Sound Hardware Test Wizard in WinXP. First, connect your microphone or headset to your line-in or microphone input on your PC. Go into the Sound And Audio Properties window and click the Voice tab. Under Voice Recording, click the Test Hardware button, and Windows will start a wizard that helps troubleshoot voice input channel problems and then sets the right levels for acceptable playback.
Isn’t This Supposed To Be A CD Player?
 Yes, your PC is supposed to play CDs at least as well as most dedicated CD players, but it doesn’t always work out that way. If you want your music CDs to start right away and use the media player software of your choice, then double-click the My Computer icon on your Desktop. Right-click your optical disc drive and select Properties from the drop-down menu. In the drive’s window, click the AutoPlay tab and the drop-down menu arrow to choose Music CD. Under Actions, click the Select An Action To Perform radio button. The list below will show you all the possible actions Windows can perform whenever you put in a CD. Highlight your choice and click OK to activate it. If your CD is already playing but you don’t hear any sound, then open the Sounds And Audio Device Properties window from the Control Panel. Click the Advanced button under Device Volume and check to make sure that CD Player volume slider is set to 70% and that the Mute box does not have a check in it. Another final fix to try on an older computer is to see if the CD drive itself has a volume knob below the disc tray. If it does, turn the volume up to just below maximum and see if that brings your CD sound back.
I Have 5.1 Speakers & 2.1 Sound
Just because you have a fancy surround sound speaker kit doesn’t mean that your Windows computer knows how to use all six channels. Very often, software upgrades and audio settings from other programs will reset your audio output for standard two- or three-speaker arrangements even if you have full surround sound. If you aren’t getting audio from all of the speakers attached to your computer, then go into the Sound And Audio Devices Properties window (see above for directions). Click the Volume tab and the Advanced button under Speaker Settings. In the Speakers tab, under Speaker Setup, click the drop-down menu to select the appropriate speaker setup. Surround sound games and DVDs will only take advantage of all of your speakers if the basic speaker setup is correct in this window. Keep in mind that only some audio sources will take advantage of all six speakers in a 5.1 audio setup. In many cases, MP3 music and basic sound effects will only play back in stereo (two speakers) unless you’ve specifically instructed your audio hardware to “expand” all audio to your full four- or five-speaker set. To expand all audio, you must find your audio hardware’s control software. (Please see “Basic Troubleshooting: Audio Cards” for more information.)
The Twisted Chain Of Audio Settings
In many PCs, two sources control your audio input/output: WinXP and software associated with an audio add-on card or the built-in audio chipset for your motherboard. This can make the process of troubleshooting audio problems frustrating because your settings may be proper in the WinXP control boxes, yet the audio hardware’s drivers and software may be overriding the system settings. Most of the tips in this article deal with WinXP settings because the software for your audio hardware is particular to that hardware. As a general rule, however, you should locate that software. If it is an add-in card, one of the most likely manufacturers is Creative Labs, so look for that listing in Programs (Click Start and select Programs from the menu). If your audio functions come straight from your motherboard, then you may be looking for control software from Realtek, Nvidia, ESS, C-Media, AD SoundMAX, or Via/IC Ensemble, to name some of the most likely providers.
Weird Noises In The Attic
The source of audio distortion can be just as elusive as “no sound” problems. Again, the first response is to check the hardware. If your audio comes through an add-in card, you may be suffering interference from the many radio-emitting parts within a computer. For instance, if you hear chirping or buzzing when your hard drive is active, then your audio card may be picking up “noise” inside the computer case. One common cure is to move the audio card into the slot furthest from the hard drive and from any network interface card. Before moving the card, uninstall the audio drivers so you can reinstall them fresh after moving the audio card. (Please see “Basic Troubleshooting: Audio Cards” on how to do this.)
No Fun
Some of the most vexing audio problems arise when playing computer games, DVD movies, or MP3 audio files. Audio and video often interact with one another, and each can undermine the other’s performance. Entertainment software that uses 3D graphics or 5.1 audio tends to push your system to its limits and expose underlying weaknesses that can affect sound quality. For instance, video performance in 3D games can affect the audio, and you may get audio pauses or “hiccups” in the audio tracks during game play. In this case, your first line of defense is to address the video. Try to update the drivers for your graphics card because the card processes the images and sends that information across the motherboard, which can impact the audio track, as well. Of course, update your sound card or audio chipset drivers, too. (Please see “Basic Troubleshooting: Graphics Cards” for more information.) Audio “burps” may also come from a setting buried deep within your Sound And Audio Devices Properties window. Access those controls through the Control Panel (see previous directions) and click the Audio Tab. Under Sound Playback, click the Advanced button. The Advanced Audio Properties window controls the quality and range of audio features Windows uses. If you’re experiencing persistent audio distortion in games or even in music, click the Performance tab in this window and move the Hardware Acceleration slider to one notch below the Full setting. This disables some of the most advanced audio features and may produce cleaner multimedia sound. Click OK to activate the setting. In games or other multimedia such as DVD and MP3 playback, audio burps can also come from a badly fragmented hard drive. Over time, pieces of saved files are stored in different places on your hard drive, which makes your computer strain harder when accessing data and interrupts the audio flow. If your audio problems occur when you can see the hard drive access light flicker on your PC or hear the drive loading data, then you may need to defragment the drive. Double-click My Computer, right-click the drive letter where your computer stores Windows (usually the C: drive), and select Properties from the drop-down menu. Click the Tools tab and under Defragmentation, click the Defragment Now button. The process could take up to an hour or more to complete, but it creates a cleaner pathway for your data, including audio files.
Hiss
The interior of a computer can produce electrical “noise” that results in background hissing through your speakers or headphones. The first cure is letting your speaker system do the amplification rather than your audio card or motherboard. As in the examples above, go into the Sounds And Audio Properties window via the Control Panel. Click the Volume tab and the Advanced button under Device Volume. In the Play Control window, set all of the volume sliders to 70% or 80% and leave them there. Setting your computer’s output volume to the max tends to overdrive the onboard amplifier, which generally isn’t as efficient as the amplifier in your external speakers. From now on, if you rely on your speakers to control volume, you should get a cleaner sound. If the hissing or buzzing persists, then you are probably experiencing interference from one of the multiple audio channels going into and out of the computer. The Line-In channel is the most likely suspect when it comes to a constant hissing. In the same Play Control window as above, click the Mute box under the Line-In column to block any audio input coming from that channel. Of course, if you use that audio input for a microphone or some other external audio input, then you will need to un-Mute the channel whenever you need to use the external device. The other culprit may be your Microphone channel. Again, in the Play Control window, look for the Microphone channel. If it doesn’t show up, click the Options menu and select Properties from the drop-down menu. Under Show The Following Volume Controls, place a check mark in the Microphone box and click OK. You should now see the Microphone box. Place a check mark in its Mute box to silence any background noise that may be coming from that channel. In fact, you can keep your audio clean by muting any input or output channel that you don’t need. In the end, if you’re having computer audio problems, the general rule is don’t set anything to the max. Also, be sure to always check for obvious solutions to your problems (be sure speaker cables are connected correctly) and then move on to the less obvious.


0 comments:
Post a Comment